How to Set Up Yerba: A Step-by-Step Guide
By The Yerba Team · · Updated
Share this


Setting up Yerba takes about two minutes and six short steps. You build your page, choose how the chat looks and sounds, connect the links you already share, and copy your new link into your bio. This guide walks through each onboarding screen so you know exactly what to expect.
Yerba is an AI link in bio: instead of a static list of buttons, your one link opens into a chat that greets each visitor in your voice and points them to exactly what they came for. Below is the full setup, screen by screen, with what each field does and why it matters.
What you need before you start
You can finish the whole setup on your phone in one sitting. It helps to have three things ready: a clear, PG profile photo, a sentence or two about how you talk, and the links you want fans sent to (your other socials, your shop, your latest drop).
Nothing here is permanent. Every choice below (your theme, your chat's personality, your links) can be edited later from your dashboard settings, so it is fine to move fast and refine afterward. Setup is free, and you can claim your handle before you commit to anything.
Step 1: Build your page
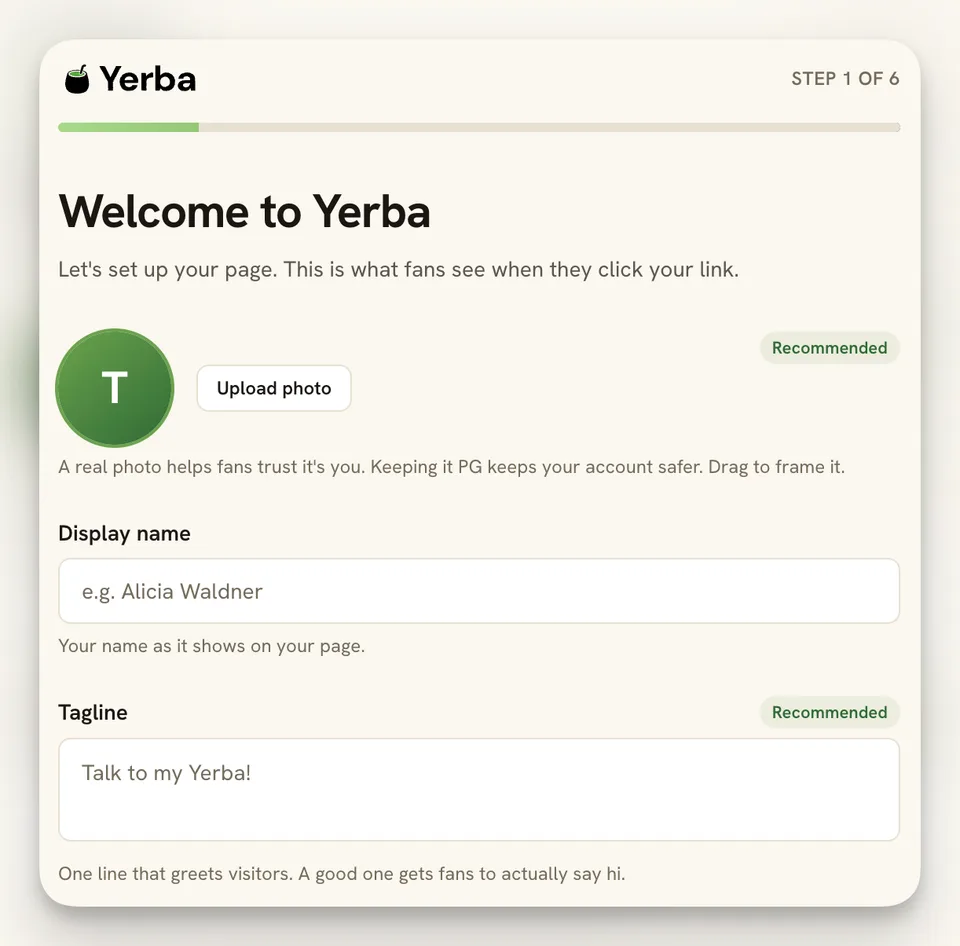
The first screen, Welcome to Yerba, builds the page fans see when they tap your link. Add a profile photo, a display name, and a tagline.
Upload a photo. A real photo helps fans trust that it is actually you. Keep it PG: a clean, safe-for-work image keeps your account safer and stops a bio link from getting your reach throttled. You can drag to reframe it.
Display name is your name as it appears at the top of your page. Tagline is the one line that greets visitors (the default is "Talk to my Yerba!"). A warm, specific tagline gets more people to actually start a chat.
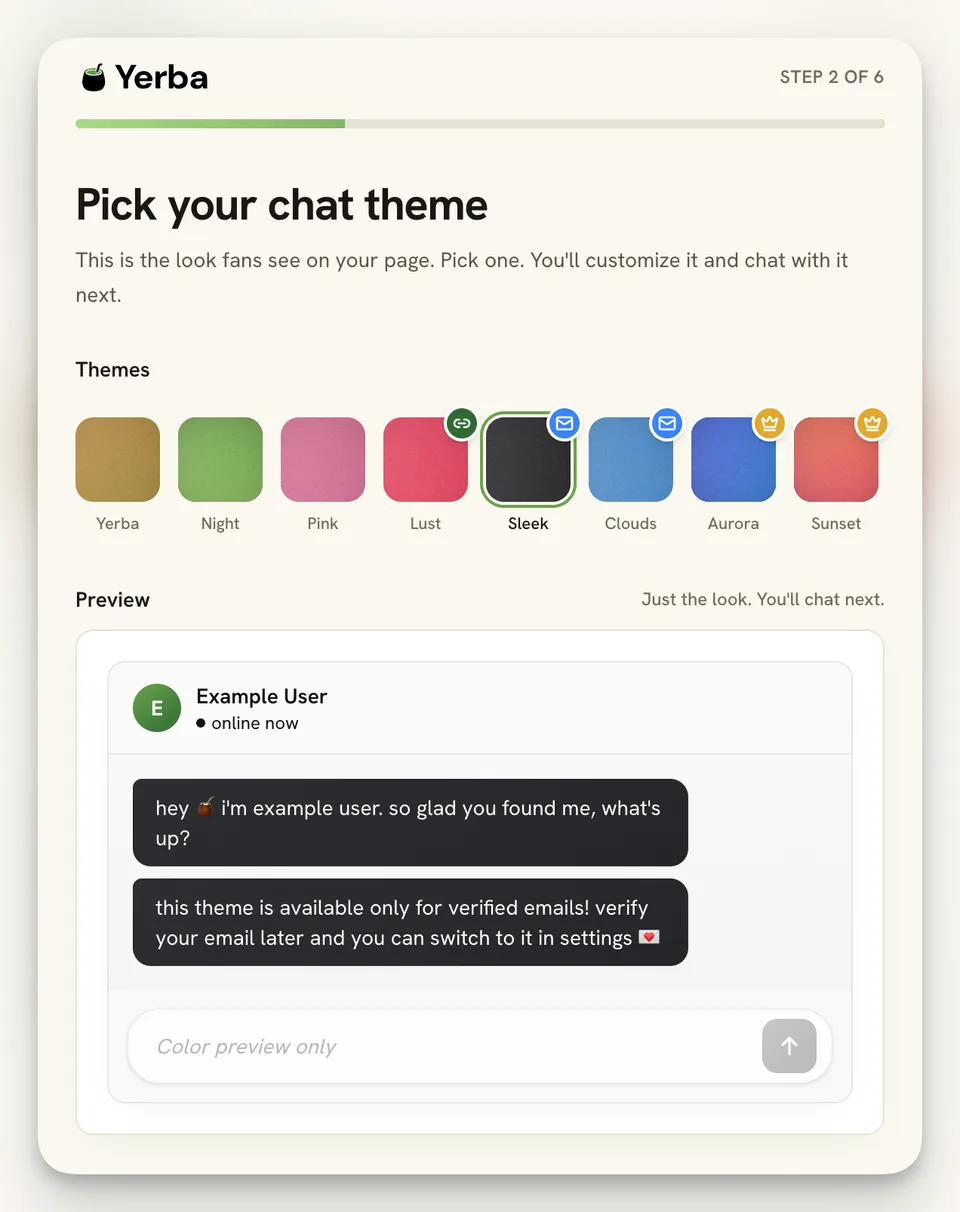
Step 2: Pick your chat theme
Next you choose the theme: the colors and look fans see on your page. Pick one now and preview it live below the picker; you will customize the voice and chat with it in the next steps.
The starter themes are Yerba, Night, and Pink, free for everyone. A few premium themes unlock as you go: Lust unlocks when you connect an integration, Sleek and Clouds unlock once your email is verified, and the animated Aurora and Sunset themes are part of the paid plan. You can switch themes any time from settings, so nothing here locks you in.
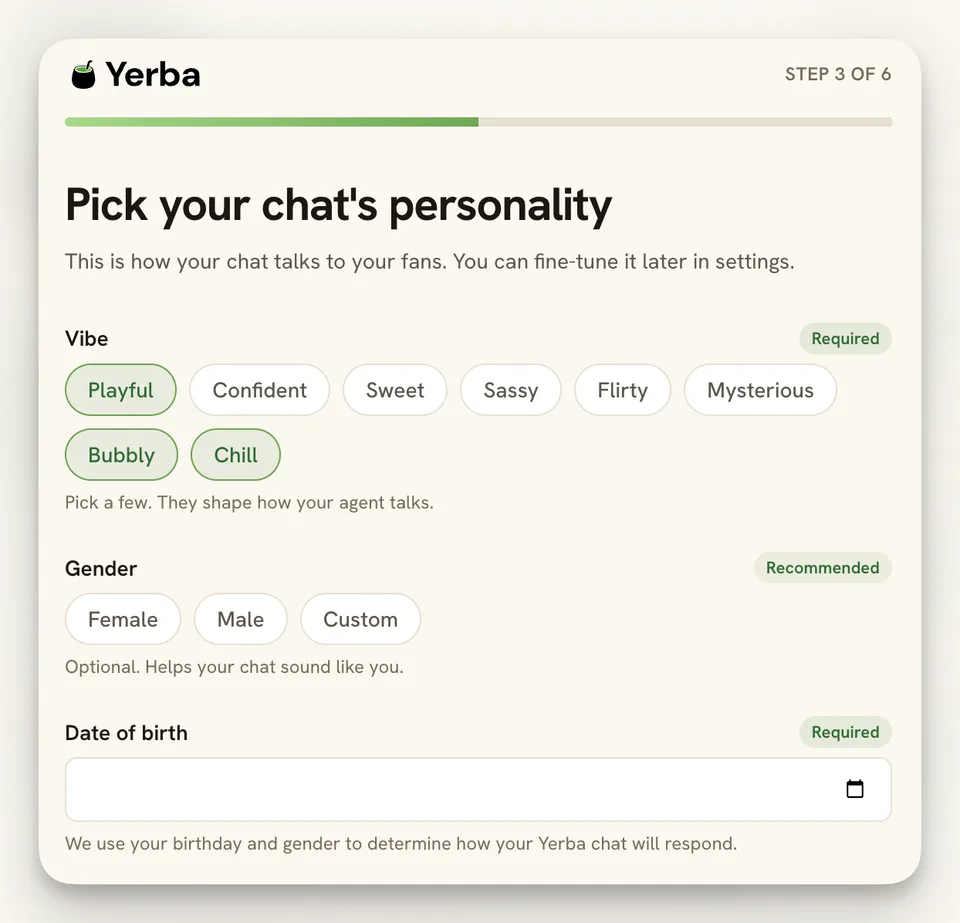
Step 3: Set your chat's personality
This screen sets how your chat talks to fans. Pick a vibe, optionally a gender, and your date of birth. As always, you can fine-tune all of it later in settings.
Vibe is required: choose a few chips that shape how your agent sounds. The options are Playful, Confident, Sweet, Sassy, Flirty, Mysterious, Bubbly, and Chill. Pick the handful that match how you actually talk.
Gender is optional and helps the chat sound like you. Date of birth is required: Yerba uses your age and gender to decide how your chat responds. Your birthday is never shown to fans.
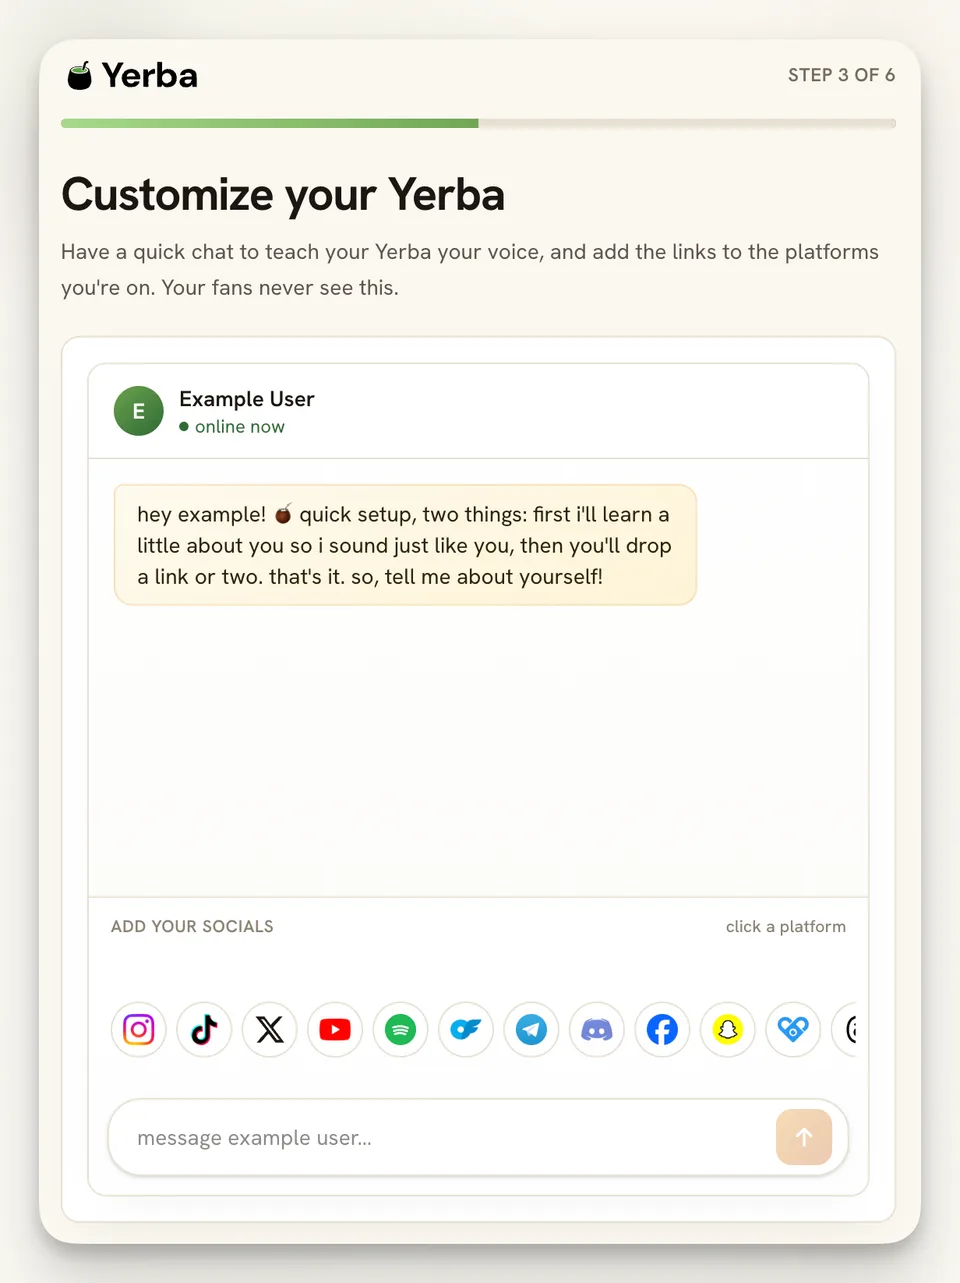
Step 4: Teach your chat your voice
Now you have a quick, private chat that teaches your Yerba how you talk, and you drop in a link or two. Your fans never see this conversation; it is just how the agent learns to sound like you.
The agent opens by asking you to tell it about yourself. Answer in your own words, the way you would text a friend, and it folds that into its voice. While you are here you can also start adding socials from the strip below the chat: tap a platform icon and paste your profile link.
Two or three sentences is plenty to start. The more it knows about how you talk and what you point people to, the more your page feels like you from the very first reply.
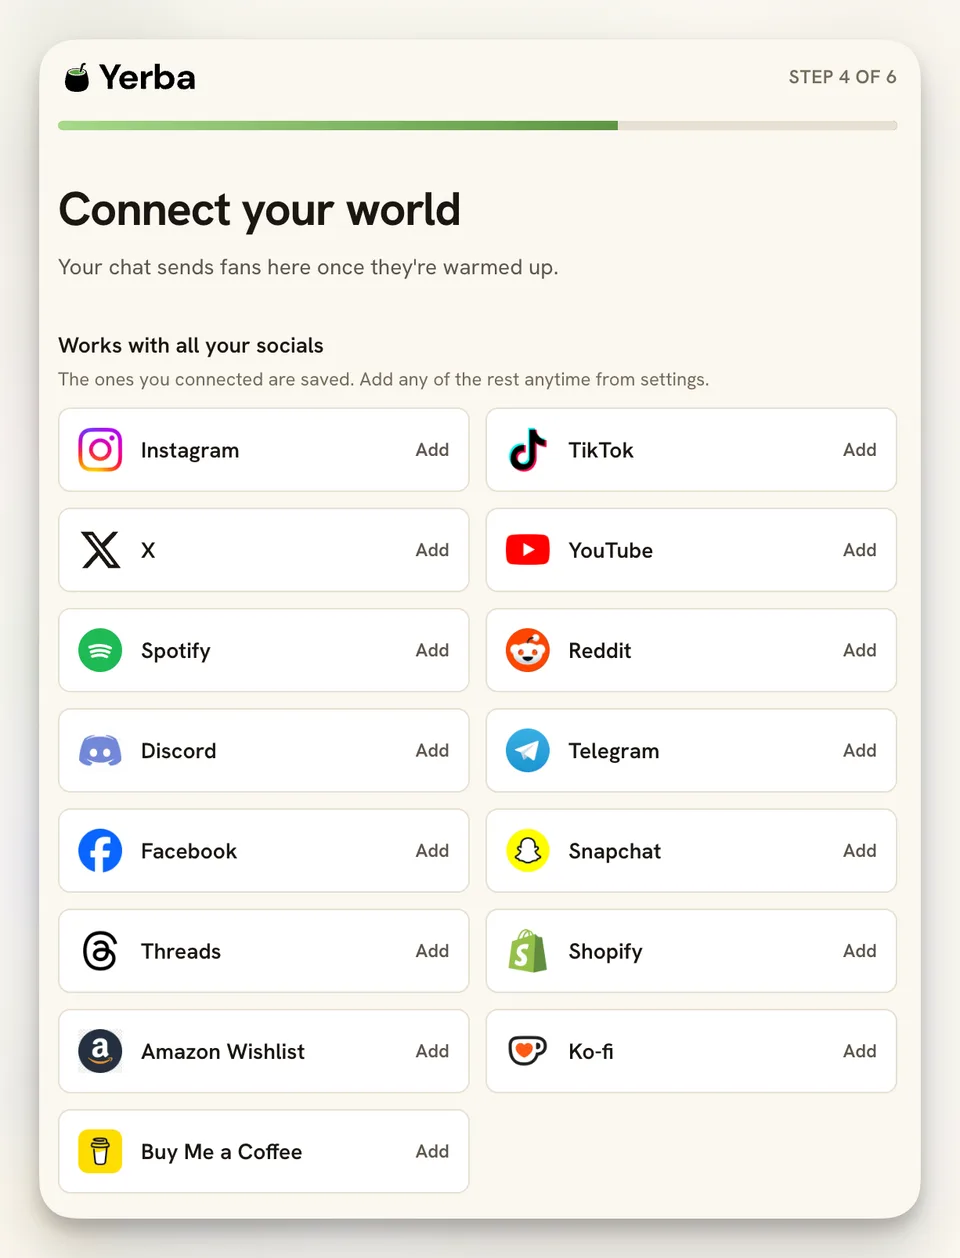
Step 5: Connect your socials and links
The Connect your world screen is where you wire in everything your chat can send fans to once they are warmed up. Yerba works with all your socials and shops; the ones you already connected are saved, and you can add any of the rest later from settings.
Tap Add next to a platform and paste your profile or shop URL. Here is the full list of integrations Yerba supports today, and what each one is for:
- Instagram: send fans to your Instagram profile.
- TikTok: link your TikTok so viewers can follow you there.
- X: connect your X (Twitter) profile.
- YouTube: point fans to your YouTube channel.
- Spotify: share your Spotify artist page or playlists.
- Reddit: link your Reddit profile or community.
- Discord: invite fans into your Discord server.
- Telegram: connect your Telegram channel or username.
- Facebook: link your Facebook page or profile.
- Snapchat: add your Snapchat so fans can follow you.
- Threads: connect your Threads profile.
- Shopify: send fans straight to your Shopify store.
- Amazon Wishlist: let fans spoil you with gifts from your Amazon wishlist.
- Ko-fi: take tips and one-off support through Ko-fi.
- Buy Me a Coffee: accept tips and small payments via Buy Me a Coffee.
Step 6: Copy your link and go live
The final screen confirms you are live. You get a gold Verified Creator badge on your profile so fans know it is really you, and your chat now replies around the clock in your voice, sends fans to every link you added, and keeps your pages hidden from the bots that scrape them.
Your link sits at the top, in the form yerba.chat/yourname. Tap Copy, then paste it into your bio, starting with the platform where your fans already are (Instagram is a great first home for it). The moment someone taps it, the conversation begins.
Under More ways to earn, Yerba surfaces extras like Amazon Wishlist, Ko-fi, and Shopify that you can add whenever you want; there is no setup required now, and they live in your dashboard for later. That is it. Your AI link in bio is live.

What happens after setup?
Once your link is in your bio, every visitor gets a one-to-one conversation instead of a wall of buttons. Your dashboard shows who is showing up, where they came from, which links convert, and how many bots were screened out before they reached you.
From settings you can refine everything you set up here: rewrite your voice, swap your theme, add or remove integrations, and add unlimited custom links. See the full picture on how it works, browse every integration, or check the pricing. If you get stuck, the Help Center has step-by-step answers for setup, mobile, and billing.
Frequently asked questions
How long does it take to set up Yerba?
Setting up Yerba takes about two minutes. There are six short onboarding steps: build your page, pick a chat theme, set your chat's personality, teach it your voice, connect your socials, and copy your link into your bio. You can do all of it on your phone.
Do I need a credit card to set up Yerba?
No. You can claim your handle and set up your page for free, with a 7-day trial and no credit card required to start. Yerba is a flat $14.99 a month after the trial, and it takes 0% of what you earn.
What integrations does Yerba support?
Yerba connects to Instagram, TikTok, X, YouTube, Spotify, Reddit, Discord, Telegram, Facebook, Snapchat, Threads, Shopify, Amazon Wishlist, Ko-fi, and Buy Me a Coffee. You can also add unlimited custom links with any label and URL. Connect them during onboarding or any time from settings.
Can I change my theme, voice, or links after setup?
Yes. Everything you choose during onboarding (your theme, your chat's personality and voice, and your connected links) can be edited later from your dashboard settings, so nothing you pick during setup locks you in.
Where do I put my Yerba link?
Copy your link (yerba.chat/yourname) from the final onboarding screen and paste it into your bio, starting with the platform where your fans already are, such as Instagram or TikTok. The conversation begins the moment a visitor taps it.
Still have questions? If there is anything we did not cover here, visit our Help & Support Center and a real person will help you out.